SSO Setup Guide — Microsoft Entra ID (formerly Azure AD)
| UAT | Prod | |
|---|---|---|
| App name | eezi_UAT_SSO | eezi_PROD_SSO |
| Identifier (Entity ID) | urn:amazon:cognito:sp:eu-west-1_jrGoNRAfk | urn:amazon:cognito:sp:eu-west-1_2y5UMRUqJ |
| Reply URL (ACS) | https://eezi-uat.auth.eu-west-1.amazoncognito.com/saml2/idpresponse | https://sso.eezi.io/saml2/idpresponse |
1. Create the Enterprise Application
- Sign in to the portal: ~https://portal.azure.com~.
- Navigate Microsoft Entra ID → Enterprise applications.
- New application → Create your own application.
- Name it something like eezi_UAT_SSO.
- Choose Integrate any other application you don’t find in the gallery (Non-gallery) and click Create.
2. Configure SAML SSO
Breadcrumb: Microsoft Entra ID → Enterprise applications → eezi_UAT_SSO → Single sign-on → SAML.
1. Basic SAML Configuration → Edit
- Identifier (Entity ID): The Identifier as per the table above, .e.g, urn:amazon:cognito:sp:eu-west-1_jrGoNRAfk
- Reply URL (ACS): The reply URL as per the table above, e.g., https://sso.uat.eezi.io/saml2/idpresponse
- Leave Logout URL blank or repeat the Login URL if your organisation plans SP-initiated sign-out later.
- Ensure Token encryption is Disabled (default).

SAML Configuration
2. Attributes & Claims → Edit
- Click Unique User Identifier (Name ID) and set:
- Name ID format: Email address
- Source: Attribute
- Source attribute: user.mail
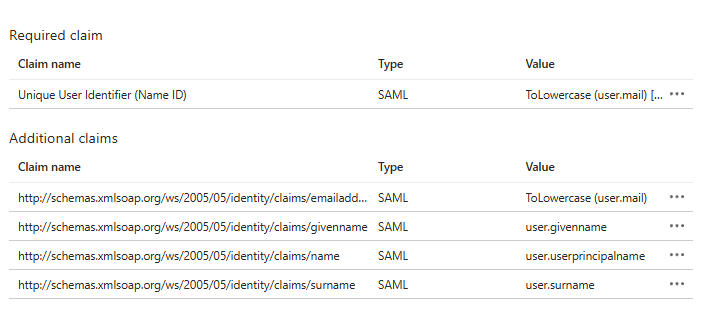
Attributes and claims
| Note |
|---|
| For migration and linking to existing users, the email address claim must be transformed to lowercase. |
3. SAML Certificates / Federation Metadata
- Instead of downloading the Base-64 cert, copy the App Federation Metadata URL (visible just below the download buttons).
4. Set up eezi_UAT_SSO
- Copy the Login URL and Microsoft Entra Identifier shown here.
3. Share Details with eezi Support
Provide your eezi technical support contact with:
| Item | Where to find it | Notes |
|---|---|---|
| App Federation Metadata URL (preferred) | Step 2.3 | Gives eezi automatic endpoint & cert updates. |
| Login URL | Step 2.4 | Also called Sign-in URL. |
| Issuer (IdP Entity ID) | Step 2.4 | The Microsoft Entra Identifier. |
| Certificate (Base64) (optional) | Step 2.3 | Only if your policy forbids sharing the metadata URL alone. |
| All relevant domain identifiers | - | For SSO detection and identification on sign-in and sign-up |
In your support ticket/email, send the metadata URL, login URL, and issuer, mentioning your organisation name and that it’s for eezi UAT SSO.
4. Assign Users & Groups
- In the app blade, choose Users and groups.
- Add every user or group that should access eezi UAT.
- Make sure you are assigned so you can test.
5. Testing & Go-Live
- Wait for confirmation from eezi support that your metadata/cert is loaded.
- Test: Launch the Login URL or initiate a sign-in from eezi UAT.
- Success? eezi enables SSO for all assigned users.
- Communicate any future user-assignment changes in Entra to your eezi support contact.
Important Notes
- Enabling SSO doesn’t sign existing users out immediately.
- Keep your assigned user list current; only assigned accounts can sign in.
- If Entra rotates its signing certificate, eezi will pick it up automatically via the metadata URL—no manual action required.
Updated 8 months ago
Did this page help you?